What is Multi-Factor Authentication (MFA)?
Multi-Factor Authentication (MFA) is a security measure that requires users to provide two or more verification factors to gain access to an account, application, or system. Unlike traditional single-factor authentication, which only requires a username and password, MFA adds additional layers of security by requiring something you know (password), something you have (a smartphone or security token), or something you are (biometric verification such as a fingerprint or facial recognition).
Using MFA significantly reduces the risk of unauthorized access, even if your password is compromised. This added security is crucial for protecting sensitive information and maintaining privacy in a digital age where cyber threats are constantly evolving.
Common types of MFA include:
- Authenticator Apps (Recommended): Apps like Google Authenticator or Microsoft Authenticator generate a time-sensitive code (TOTP) that must be entered in addition to your password.
- SMS or Email Verification Codes: A code is sent to your mobile phone or email address that you must enter in addition to your password. However, this method is less secure than authenticator apps or biometric methods.
- Biometric Verification: Uses physical characteristics, such as fingerprints or facial recognition, to verify your identity.
- Security Tokens: Physical devices that generate or display authentication codes.
Step-by-Step Guide to Setting Up MFA
We recommend using authenticator apps for Multi-Factor Authentication (MFA) to enhance security. Feel free to use your favorite authenticator app if you already have one. For this example, we're using iCloud Keychain because it's built into every Apple device, providing convenience and ease of use. And Microsoft Authenticator if you want to use your phone.
If you use Chrome or Chromium browser, you can download the iCloud Passwords extension to sync your passwords and verification codes, making it easy to manage your authentication securely across different platforms.
Step 1: Navigate to the Security Info Page
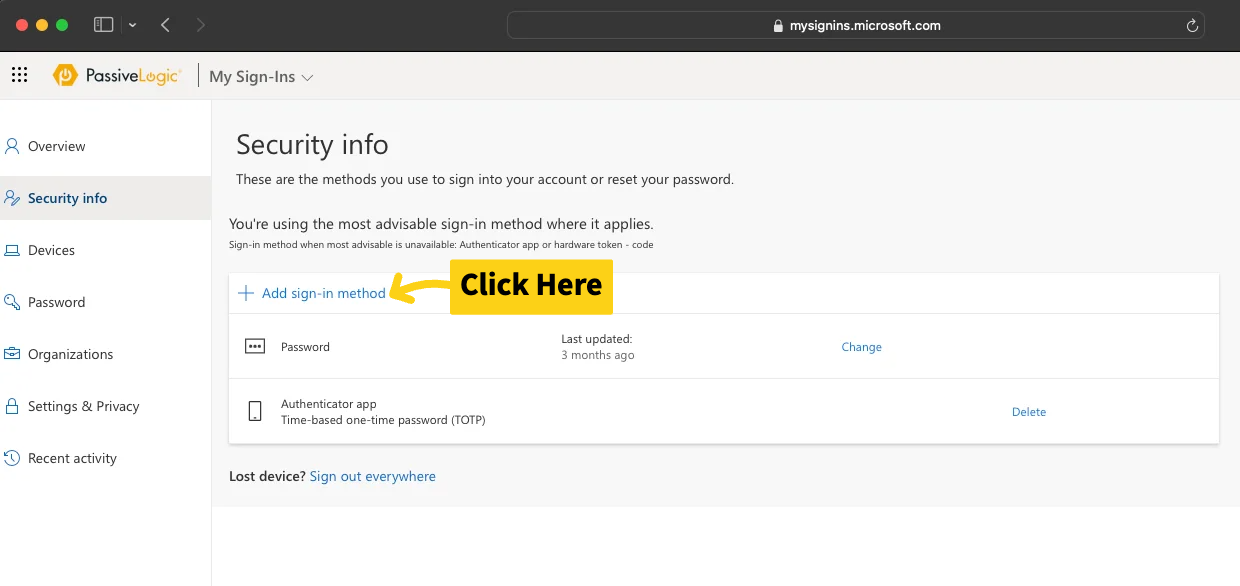
Navigate to this page: https://mysignins.microsoft.com/security-info and click "Add sign-in method".
Step 2: Choose Your MFA Method
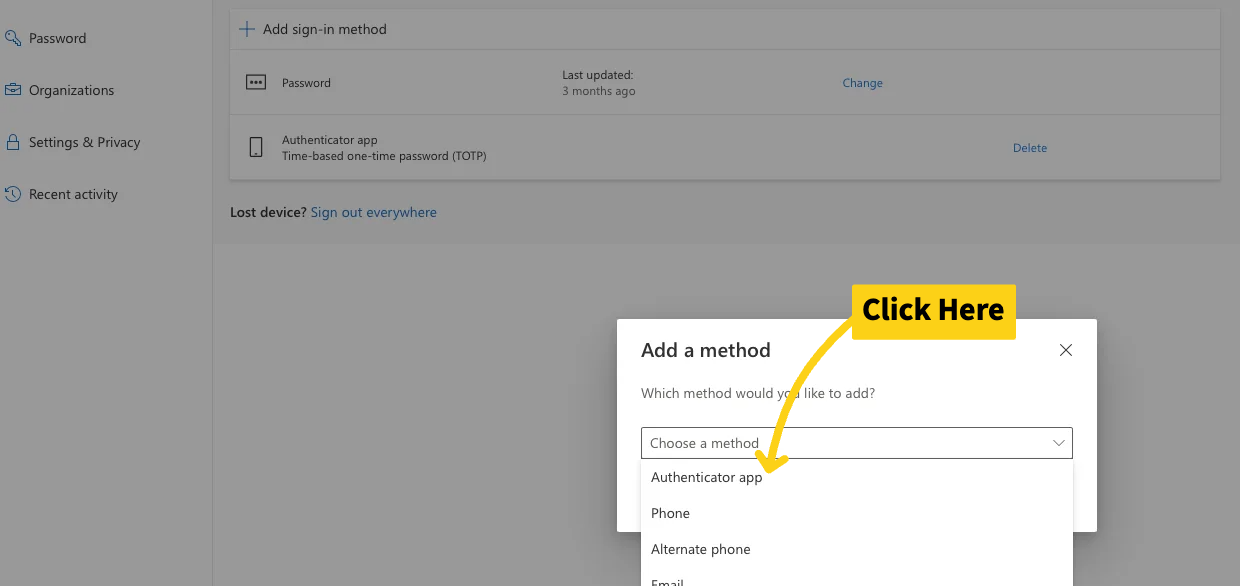
Click "Choose method" and select "Authenticator app." If you prefer another method, choose that, but we don't recommend using phone or SMS for security reasons.
Step 3: Select Your Authentication App
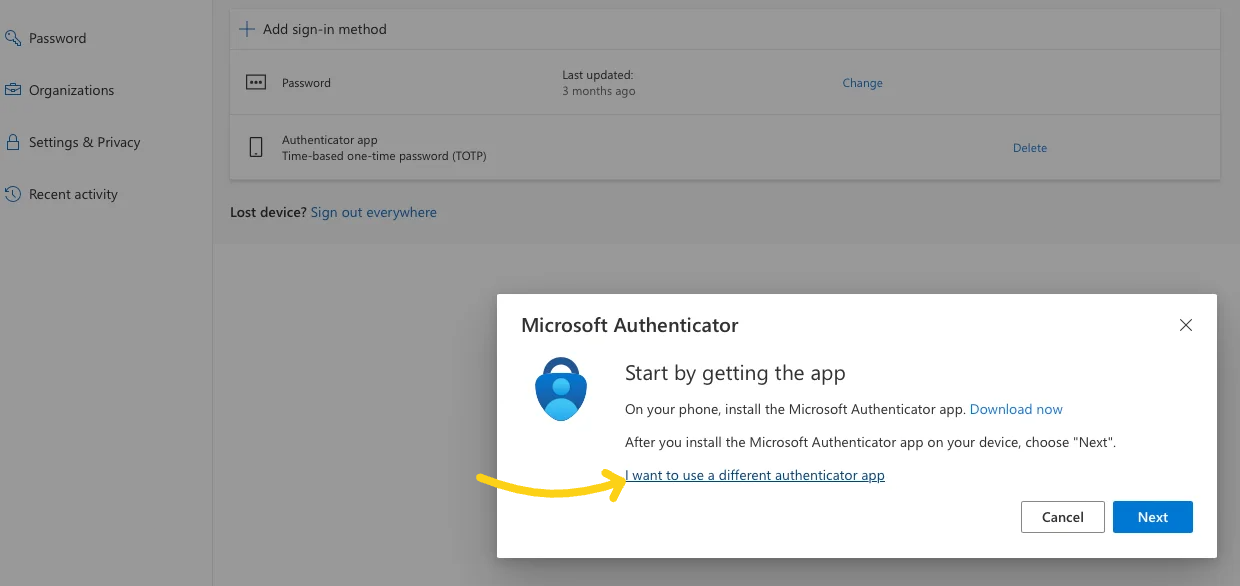
If you already have a preferred app, you can continue using it. For those who want the convenience of autofill on macOS, iCloud Keychain is a great choice. If you prefer to use your phone with the flexibility of generating Time-Based One-Time Passwords (TOTP) or the ease of passwordless authentication by simply approving a notification, Microsoft Authenticator is an excellent option.
Choose Your Preferred App
- Set Up Microsoft Authenticator - Use on your phone
- Set Up iCloud Keychain - Use on MacOS
Set Up Microsoft Authenticator
Step 4: Start by Getting the App
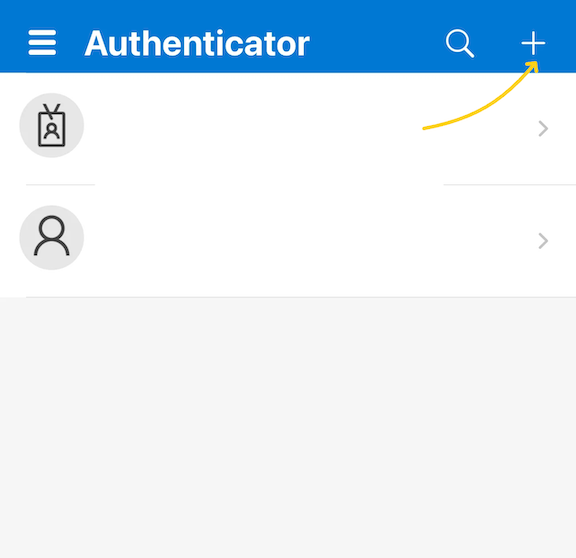
Download Microsoft Authenticator from here. Open the app, then click the '+' icon at the top.
Step 5: Add Your Account to the Authenticator App
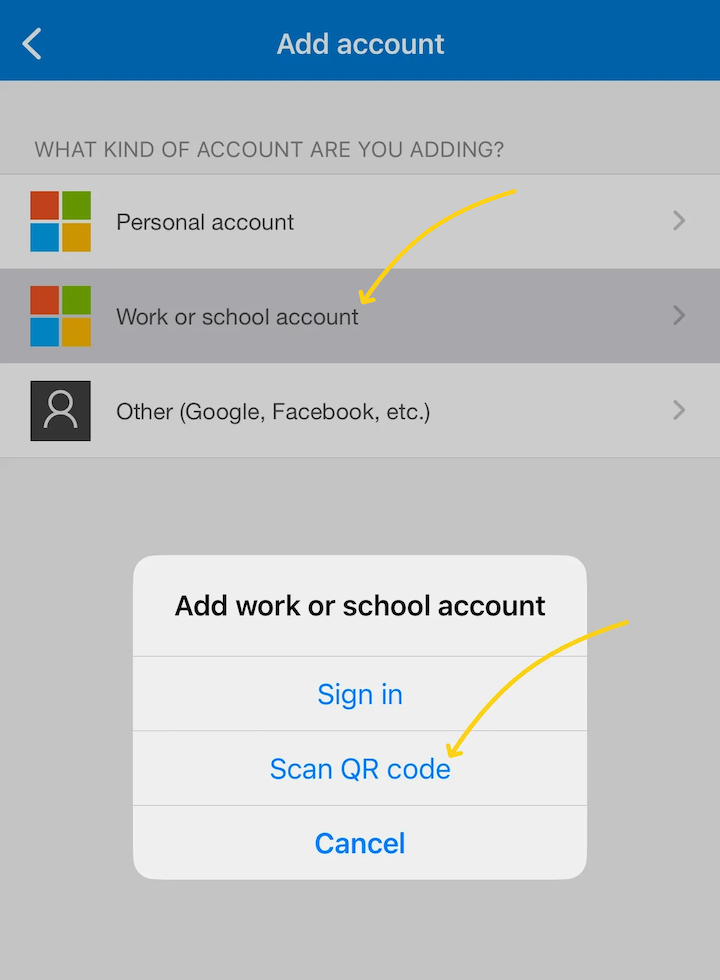
Click "Work or school account" and select "Scan QR code".
Step 6: Scan the QR Code
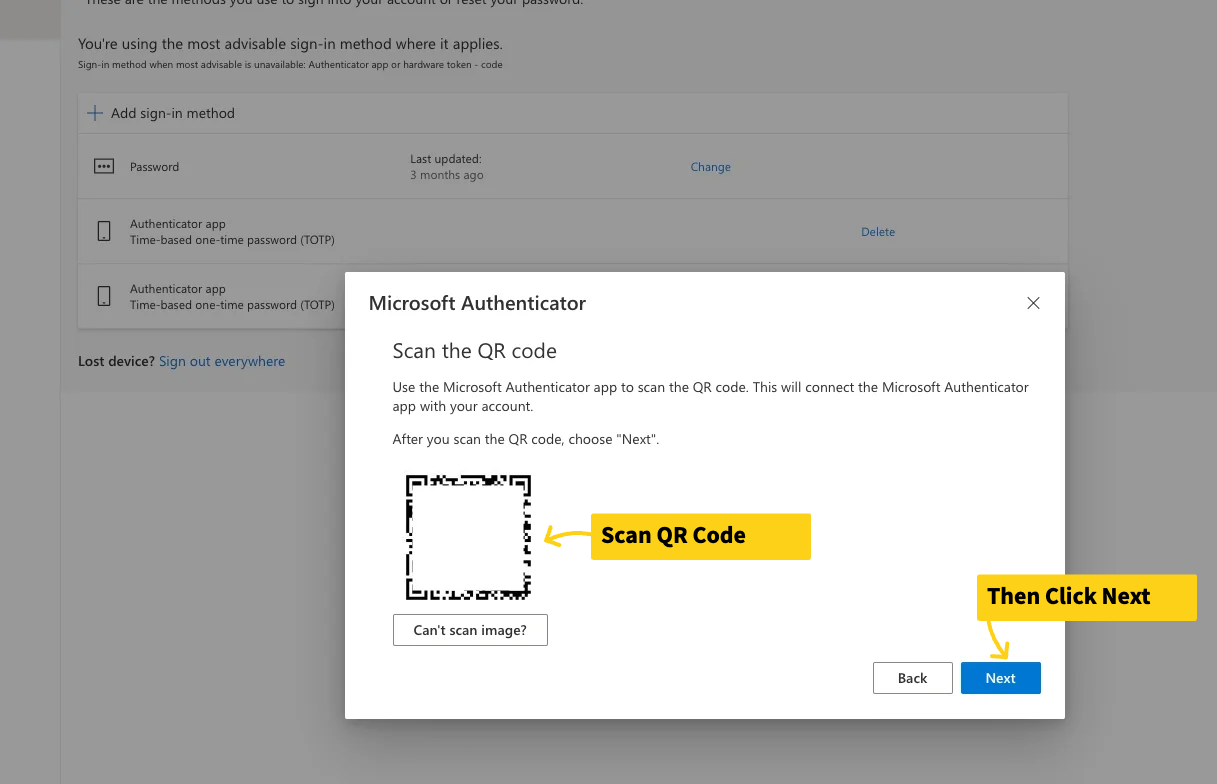
Use your phone to scan the QR code displayed on your computer screen. Once scanned, click "Next".
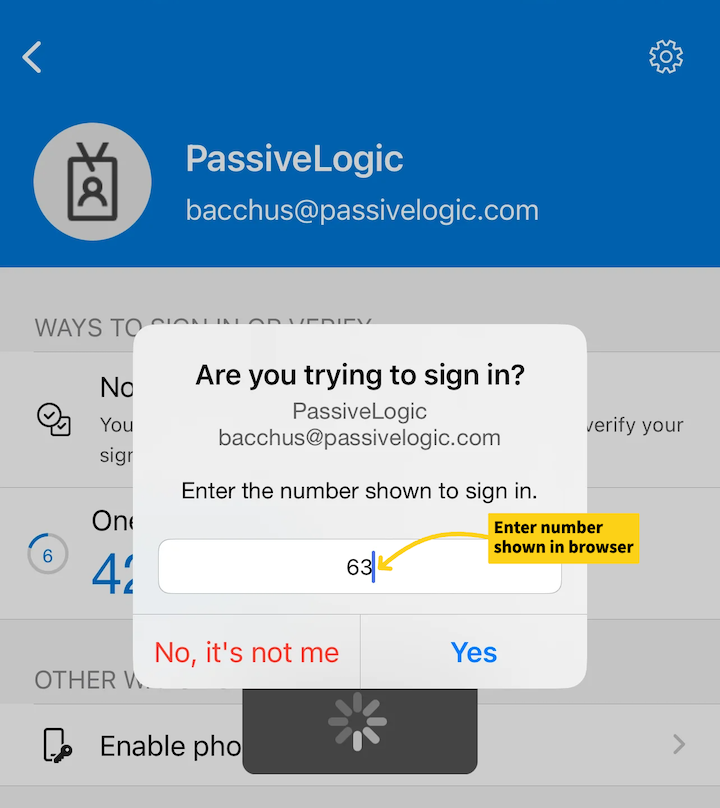
Step 7: Verify the Setup

A notification will be sent to your phone; open it and enter the number you see on your browser screen. (See the image below)
Step 8: Complete the Setup
Follow the prompts to complete the setup. You should now see Microsoft Authenticator listed as your sign-in method.
Set Up iCloud Keychain
Step 4: Scan the QR Code or Use MacOS Authenticator

For this tutorial, we are using the built-in macOS authenticator for ease of use and convenience. If you use your phone for MFA, you can easily scan the QR code from your authentication app on your phone.
Step 5: Open MacOS System Settings

Open your MacOS system settings and find "Passwords." Use your Touch ID or computer password to access it. Note: if you're from the future and use macOS Sequoia, this has been moved to the App 'Passwords'.
Step 6: Add Your Credentials to iCloud Keychain
If you have your credentials saved in Safari or iCloud Keychain, then proceed to Step 7. Otherwise, click the "+" to add your credentials to iCloud Keychain here.
Step 7: Find the Account and Click the 'i' Button
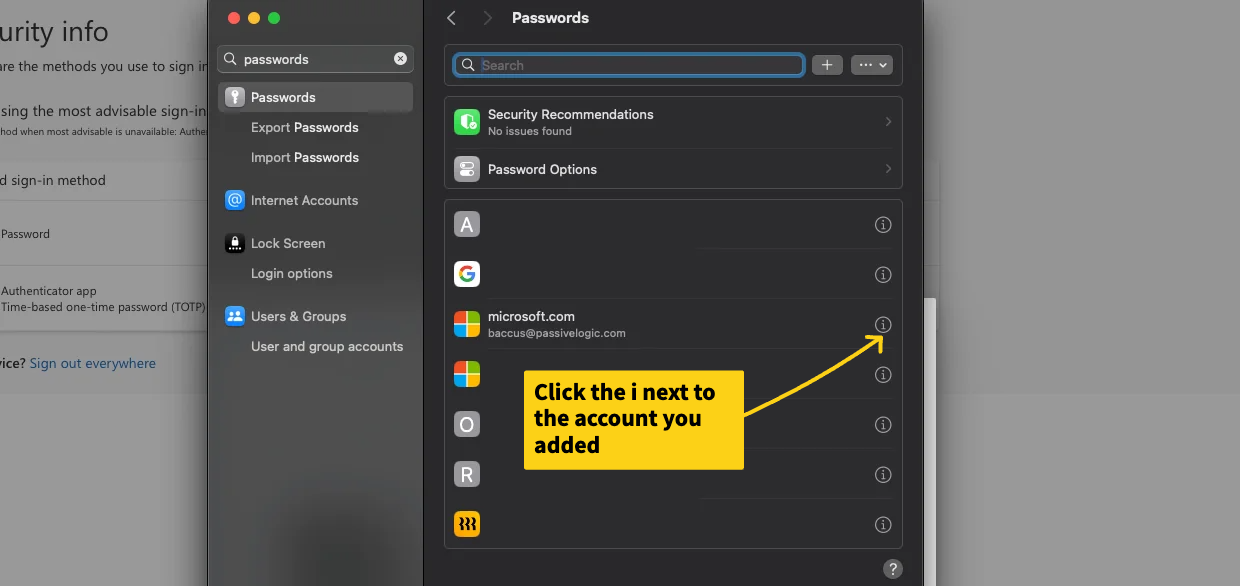
Find the account you want to add MFA to and click the "i" button.
Step 8: Set Up MFA in Account Options
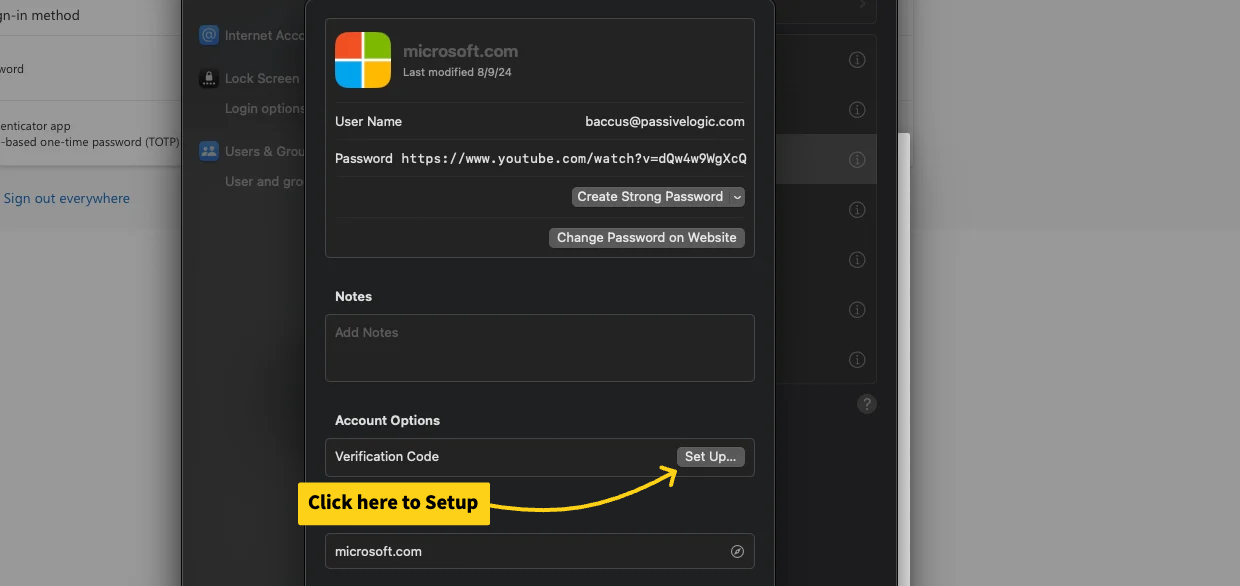
Click "Setup" under "Verification Code" in the account options.
Step 9: Enter the Secret Key

Paste the secret key we got from Step 4 and click "Use Setup Key."
Step 10: Use the Generated Verification Code
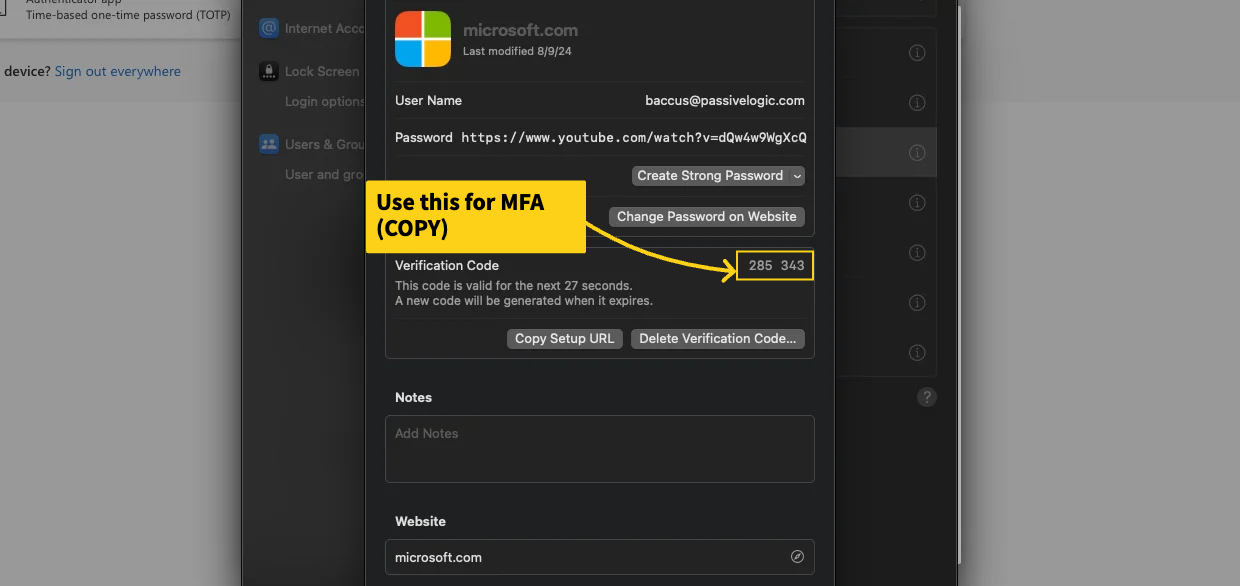
Your iCloud will now generate a verification code every 30 seconds. You can find your code here, or Safari will attempt to autofill it for you every time you sign in for your convenience.
Step 11: Enter the Verification Code
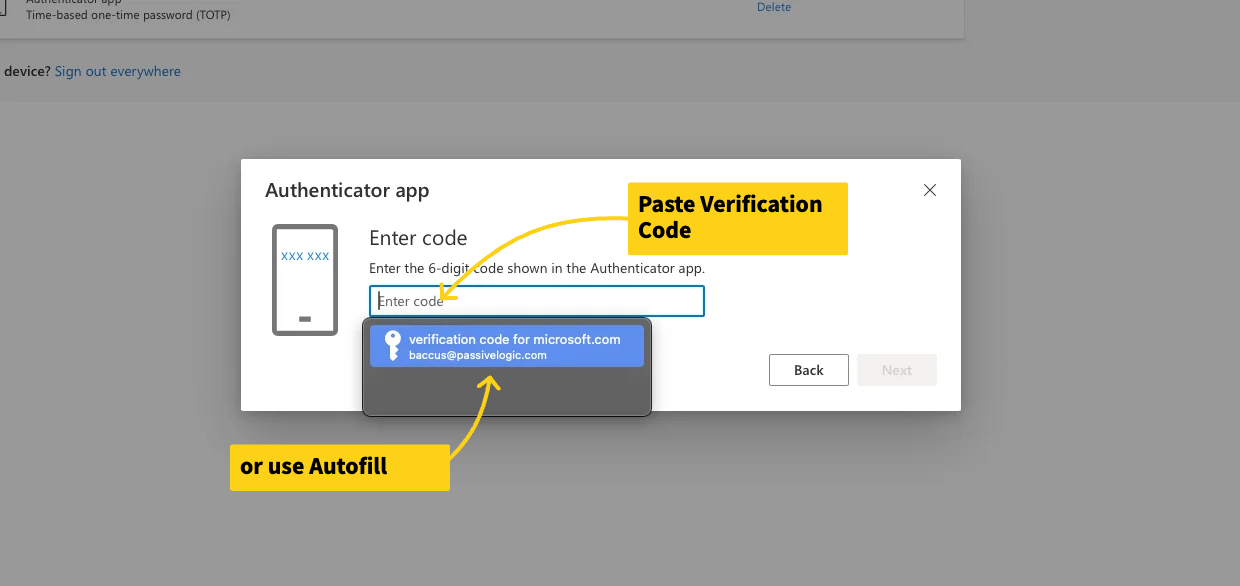
Go back to your browser and click "Next." You will be prompted to enter the verification code we got from Step 10. Paste it in the box or click the autofill option under the box.
If you have any trouble with any of these steps, please reach out to the IT/Infosec team or post a message in IT - Ask on Zoom.